Are you preparing for a longer Skinbased journey this winter season? Want to make upgrades or replace parts on your existing OAC products? In addition to building extremely durable skin skis and bindings, we offer a wide range of add-on and spare parts that can help to keep your equipment on the snow as long as possible.
In this month’s blog we will discuss our additional and replacement parts, DIY snow trekker and binding repairs, and what to keep in your Skinbased repair & maintenance kit.
Additional parts
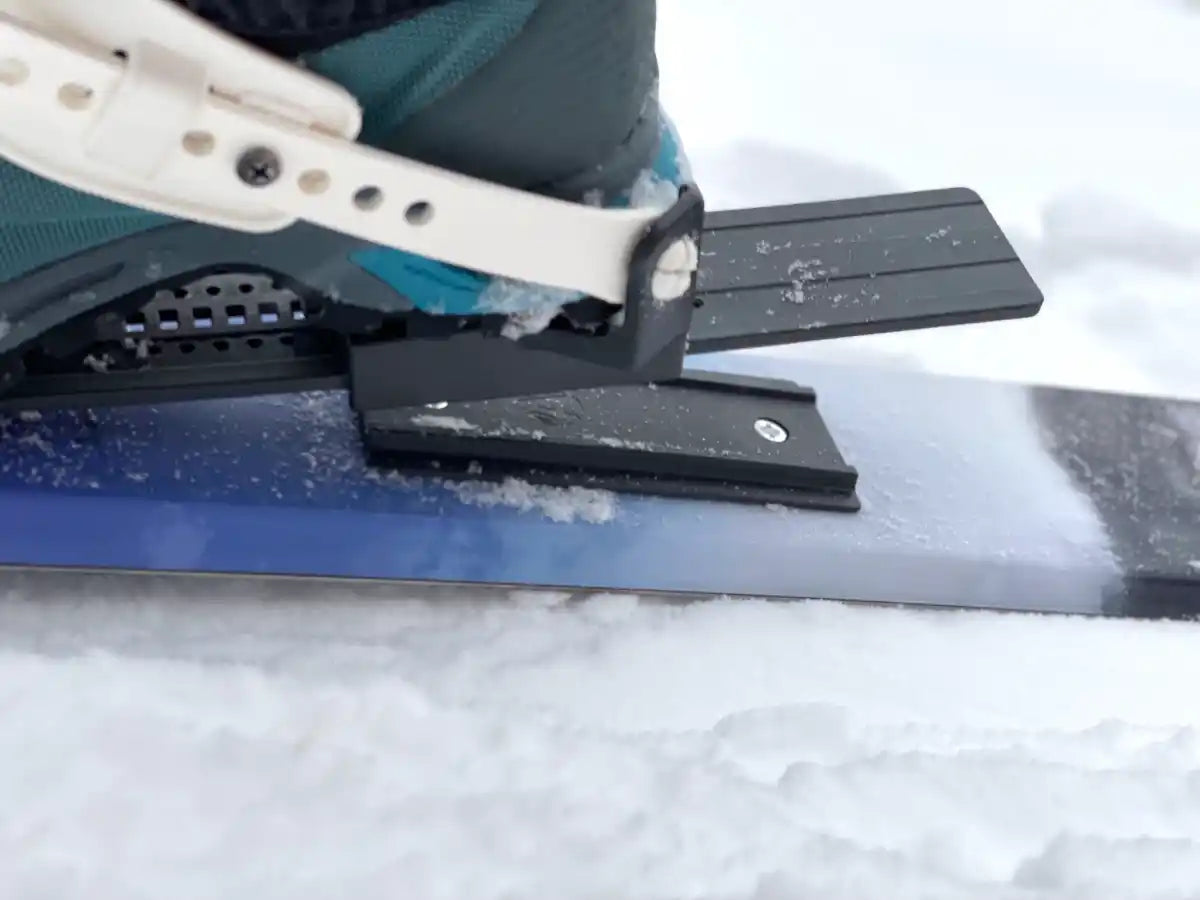
Built to provide additional lateral support for EA Bindings, the heel guide also improves ski durability. Ideal for narrower-width skis, such as the Skinbased XCD GT 160 and 137, this Heel Guide helps to keep the EA Universal Binding centered over the ski for better control and balance. It can be mounted to the ski under the EA binding flexplate via two additional screws (per ski). Be sure to follow the drilling specifications as described in our Heel Guide Installation Guide.
Replacement parts
Made of natural rubber, your binding’s rubber spring will slowly lose elasticity over time. These worn springs can become damaged or lost, so we recommend replacing springs regularly as a preventative measure. To replace, simply remove the heel unit and flip it over in your hand. Remove the damaged/old spring. Install a new spring into the groove that runs along the bottom center of the heel unit. Press firmly, ensuring that the spring is well seated and below the security notches. Reinstall the heel unit and test the spring’s tension by lifting up on the lever – you should feel resistance when doing so. Lock the heel unit back into position and you are now ready to get back on the snow.
Toe straps can take a lot of abuse, especially during repeated falls. If a toe strap fails, it can be replaced by using a PZ3 screwdriver. To replace, begin by removing the forward-most screw of the binding. Next, remove the toe piece by pulling it forward, towards the tip of the ski. With the toe piece removed, it is now possible to slide the old toe strap out by pulling on the buckle-side of the strap, perpendicular to the ski. Once removed, thread the new toe strap through the groove between the flex plate and the ski. Be sure to install the strap so that the buckle of the new strap is on the same side as before. Reinstall the toe piece and replace the front screw. Now you are ready to ski again!
Extremely durable and tough, your EA Universal’s binding’s flex plate rarely, if ever, will have an issue. The most common cause of flex plate damage is pairing it with a rigid-soled boot. As a reminder, EA Bindings are only suitable for use with flexible-soled footwear.
To replace, you will need a PZ3 screwdriver and some epoxy (preferred, but not required) or superglue. For removal of the old flex plate, begin by lifting the heel unit lever and sliding the unit off from the flex plate. Next, remove the front-most screw from the binding. Then, remove the toe piece by pulling it towards the front of the ski. Remove the two rear binding screws. Now you should have a blank ski.
To install the new flex plate, begin by placing a small amount of epoxy/super glue in each of the screw holes. Next, place the flex plate into position and install the two rear binding screws. Following this, reinstall the toe strap by threading the strap through the groove between the flex plate and the ski. Be sure to install the strap so that the buckle is on the same side as it was before. Reinstall the toe plate and replace the front screw. Tighten all binding screws with a PZ3 screwdriver. Reinstall the heel unit into the appropriate position and lock it into place by pressing down on the lever. If you used epoxy, allow it to dry in accordance with manufacturer’s instructions. Now it's time to get back to skiing!
DIY Repairs and fixes
Sometimes those sharks can really sneak up on you! Thankfully, surface level scratches to your Skinbased ski bases are mostly cosmetic and won’t affect performance. If your skis have seen some heavy use and attained a good number of base scratches, we recommend using Skinbased ski waxes to help fill them in, as well as to improve glide. For deep gouges, please see “other repairs”, below.

Did you get a tear in your ski’s climbing skin? Ouch! While certainly an advanced repair, a torn climbing skin is still something that can be fixed at home, provided the right tools are available. Field repairs are difficult but can be attempted by using super glue instead of epoxy. Simply follow the same steps as for a home repair, minus the 15-minute epoxy drying time, to the best of your ability.
To fix, start by identifying the torn/delaminated area. Clean the area (ski base and backside of skin) of any debris. You can use pliers to gently lift the skin while cleaning the ski base with a knife blade or putty knife. Avoid causing any extra damage to the skin or ski.
Apply evenly a thin layer of 2-part epoxy to both surfaces (ski base and back of the skin). Avoid touching skin hairs with the epoxy and be careful not to apply too much. A piece of cardboard is handy in this process.
After both surfaces are treated, let the epoxy dry for 15 minutes. Keep the surfaces away from each other during this period. Once the time is up, place the skin in its correct position and press hard, for 3 seconds, by hand.
For best results, clamp the repaired area for at least an hour. Position a piece of foam mat over the repaired area. Place a piece of wood on top and clamp the stack gently against the ski. Be careful not to apply too much pressure. After the clamping time has ended, check the torn skin area and cut away any loose yarn or strings from the skin backer. Once the skin is dry, it is recommended to treat the skin with Skinbased Skin Wax. Once finished, the skis are ready for the next adventure.
While extremely rare, it is possible to have a binding partially or fully pull out of the ski. This requires an extreme amount of force and is often associated with an exceptionally hard fall while wearing a heavy pack. To begin the repair, use a PZ3 screwdriver to finish removing the binding from the ski. Follow the removal instructions in the first part of the “flex plate” replacement instructions. Once binding is removed, use a sharp knife to cut away any loose material from around the binding screw holes. Place a small amount of epoxy in each of the screw holes. Next, remove a few threads from a piece of steel wool. Line each of the screw holes with these threads, being sure to only partially fill each hole. Now, follow the installation instructions found in the second part of the “flex plate” replacement instructions.
OAC’s repair services
If you have a major repair that needs undertaking, such as a full skin replacement or significant damage to the base material, please contact us directly through our website. While not every repair can be done on your own, we make every effort to find solutions that will keep your skis going as long as possible. This involves offering specialty repair services in our factory, as well as through trained, local dealers.
Skinbased Repair & Maintenance Kit
On all major outings in which an equipment failure would be catastrophic, having a good repair kit is essential. A proper kit will not only include the tools and parts needed to see you though the most common repairs, but also be lightweight and compact. Below is what we pack in our ski and binding repair kit for longer trips into the backcountry:
- EA Binding Expedition Spares kit (make sure it’s the appropriate one for your binding)
- Small ratchet screwdriver (such as a Black Diamond Binding Buddy Multi-tool) with interchangeable bits including a PZ#3, P#1, and S#6 bit.
- Multi tool incl. knife blade and pliers
- Ski Straps (such as Black Diamond Ski Strap – 25 inch)
- Skinbased Quick Wax
- Skinbased Skin Wax
- Plastic ski scraper (useful for scraping ice from your ski bases should you accidently step into water)
- Small piece of steel wool
- Small tube of super glue
While many of you may never need this advice, it’s always good to be prepared for the unexpected. For more information on additional parts, repairs, maintenance, and all things Skinbased, be sure to check out our YouTube channel!
0 kommentarer